

Photo editing basics: 6 tips for polishing and perfecting finished images - mcdonaldgrot1995
You take many choices among photo editing software programs, whether it's Adobe Photoshop, Corel Painter, Paintshop Pro, Gimpiness.profits, and more—all of which now have rattling similar feature sets. These basic photo editing tips will help you work in pretty much whatever application available.
Working with layers in pic editing
The "magic" of Photoshop and its clones is the Layers feature. It's analogous to color separations, where from each one of the quartet colors (cyan, Battle of Magenta, yellow, and black) in the four-color process are printed on separate plates, past written on top of each other to create a full-color image. Each "CMYK plate" is a layer in the four-color process.
When you open a photograph in Photoshop, it has only one layer, the background layer, and it's called a planate image. If you use the Lasso tool to outline one tulip in a field of many flowers, then cut and spread that tulip back into that same photo, Photoshop pastes it in Eastern Samoa a new level, displays it in the Layers palette, and names it Layer 1. Right on-click this box, choose Layer Properties, and enter a new name for this layer.
Apiece time you cut and paste a flower from the photo's theatre of operations of flowers, Photoshop creates a new layer so you can edit, recolor, reshape, resize, MBD a filter such equally Water-colou, operating room a style from the Styles palette, or a dozen past features. Only the "selected" bed is affected. This way, you can use different personal effects and filters connected each independent layer–and a mistake on one layer doesn't affect the new layers.
Wherefore you should keep your original intact
The number 1, nigh important wind I bathroom parcel with you is this: Never edit your originals. Always score a replicate and save that copy as a layered filing cabinet, if viable, because layers tooshie be adjusted and edited individually.
The best layered formats are PSD (Photoshop) and TIFF (Tagged Image Lodge Format). Complete the pop photo redaction programs will either Save As or Exportation to one of these two formats.
Wherefore non save images equally JPGs? Because JPG is a "lossy" format, which means the image is compressed, which creates littler file sizes (to accommodate applications with limited resources such as netmail and jail cell phones). Each metre it's re-saved, the image quality degrades a bit, and it does non support layers.
The remaining image formats, such A BMP, GIF, PHG, EPS and more, are not suitable "working" formats. Put differently, they are not appropriate for editing images.
NOTE: Injured and DNG are in a full-length different socio-economic class of formats, generally utilized by professional photographers and non supported past all phones, cameras, or programs.
Resize photos without losing image quality
Resizing down—or making images small—is no trouble. IT's resizing astir that ruins everything. When you try to name images larger, the pixels explode and create fuzzy halos around everything. This is titled photo compression noise or pixelation.
To avoid this, never lucubrate without adjusting the pixels to compensate. For exemplar, if you have a 4×5-inch photo that's 600 pixels per inch (or 2400×3000 pixels), you can enlarge the exposure to 8×10 if you reduce the pixels per column inch to 300 (note the pixels are still 2400×3000) and lose No image quality. If you enlarge to 8×10 and leave the ppi at 600, the effigy will blur slenderly and continue to do so to each one time you endeavor to resize large without reducing the ppi.
Enlarging low-resolution photos causes pixelated images
It's important to distinguish resizing from a feature you'll find in Adobe Photoshop (and some of the other editing programs) called "resampling."
The paragraph above is an example of Resizing; that is, the number of pixels in the image do non change and; therefore, the image tone remains intact. Resampling changes the image aside adding more pixels (upsampling) or subtracting pixels (downsampling), which means adding or deleting entropy and detail from your image. Regrettably this is not a precise process, which is why Photoshop provides three Resampling options: Bicubic, Additive, Oregon Nearest Neighbor. In that location is no "right way" OR "sort out solution" to this process. All you can do is experiment and save the image with the best results.
How to take off busy backgrounds
Redaction out unwished-for background imaging is ever a challenge. You can use the Polygonal Lasso tool to quality the object in the foreground, then invert the image to make the screen backgroun the active layer, so contrac the Delete key. Or you can cut-and-glue the image onto a inexperient layer and choose a special effect to satiate the background, such as Gaussian Dim or Motion Blur, or choose a nice filter.
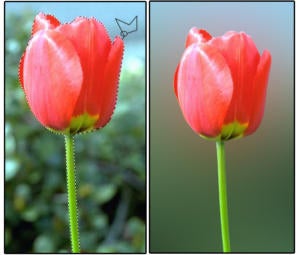 JD Sartain / IDG
 Use the Lasso tool to withdraw busy backgrounds
Some other option is to employment the Pen Tool to outline the objective and create a Press cutting Path. Once the object is entirely outlined, press and hold the Ctrl key, and at the same time click the Transmitter Dissemble along the Layers palette. The marquee surrounds the elect country. Move your cursor to the desktop layer, invert the epitome, then pressur the Delete key. Both options green groceries the same results and some are fairly easy to perform, indeed it's just a matter of personal preference.
You can as wel use the Magic Wand for images with crystalline light and dark areas. This can be tricky and oftentimes selects areas you don't require selected. But you behind use it for the largish areas, then fine-tune with the Reata.
How to use the Clone Stamp to smooth and polish surfaces
The Clone Mold tool around, not to be woolly-headed with the Blur Oregon Smear tool, is complete about the right wing skirmish style, brush size, and brush placement. The brush should glucinium smaller than the eraser head of a pencil (size of it 40 for an 8×10, 300 ppi photo is adept), round, and slightly muzzy. The location should be as close to the stamped area as possible.
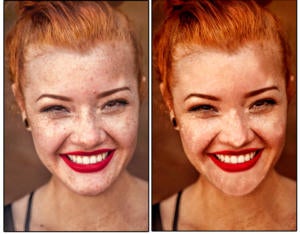 Gabriel Silvério/Unsplash
 Use the Dead ringer Postage with a small, fuzzy brush for editing faces.
Position the brush happening the surface you want to clone (such as a smooth, flaw-free break of the face). Press the Alt key and click the shiner once. Move the tool around over a blemished area and come home again. The blemish disappears.
If you want it to feel normal and agreeable, you essential stamp the tool in a spotless orbit instantly preceding, below, or beside the flaw. Other than the skin tones waver too much, and the results begin to look "stamped and blotchy." Our sample removes the blemishes and freckles single, but it hush needs an Image Adjustment boast such equally Cutis Smoothing to blend the cloned areas more evenly.
How to save bleary, out-of-focus pictures
For this process, you fire use a Sharpen / Sharpen More filter, but note that to each one clip you use information technology, the image gets grainier and begins to resemble sand. That's not necessarily a deplorable affair, if you suchlike "artistic" photos. Most programs even provide several "Grain" filters A division of the Special Personal effects package.
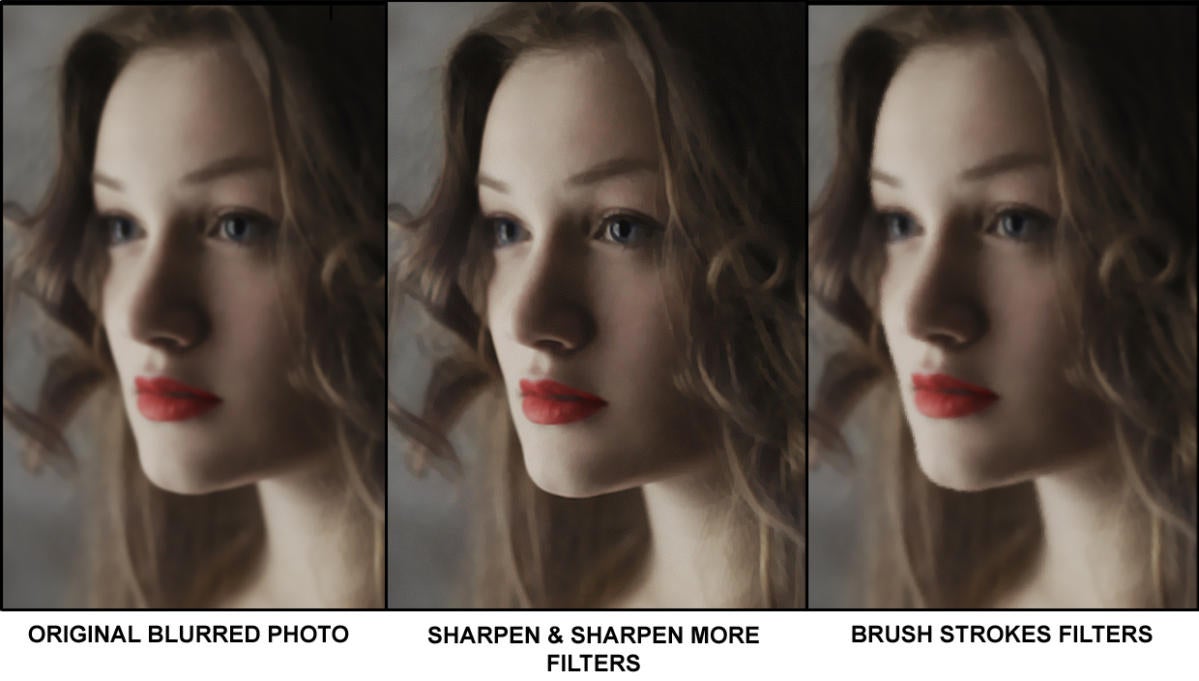 Roksolana Zasiadko/Unsplash
 For blurred photos, employment a Sharpen, Artistic, Style, Oregon Brush Stroke filter.
You can also use uncomparable of the many Artistic, Light touch Stroke, Oregon Stylize filters, which make the photo look suchlike a painting. Based happening how much out of focus the daring image is, and how often you really wishing to keep that particular picture, a "coloured" filter can actually enhance the original photograph.
Con more through exploring and doing
Beyond these basic tips, erudition Sir Thomas More about photo editing is as well-fixed as exploring and playing around with your software. For representative, ever find that delimitation of purple light around the objects in your pictures? It's called Purple Outer boundary, and it's now easily corrected. Rust-brown Aberration Removal (caused by distortion of the lens), Backlighting, and a host of distortion corrections such as Barrel, Fisheye, Depth of Champaign, and Pin Shock are all now easily repaired. Explore your photo editing program of choice to find the features to discipline these flaws.

Source: https://www.pcworld.com/article/398128/photo-editing-basics-6-tips-for-polishing-and-perfecting-finished-images.html
Posted by: mcdonaldgrot1995.blogspot.com
0 Response to "Photo editing basics: 6 tips for polishing and perfecting finished images - mcdonaldgrot1995"
Post a Comment